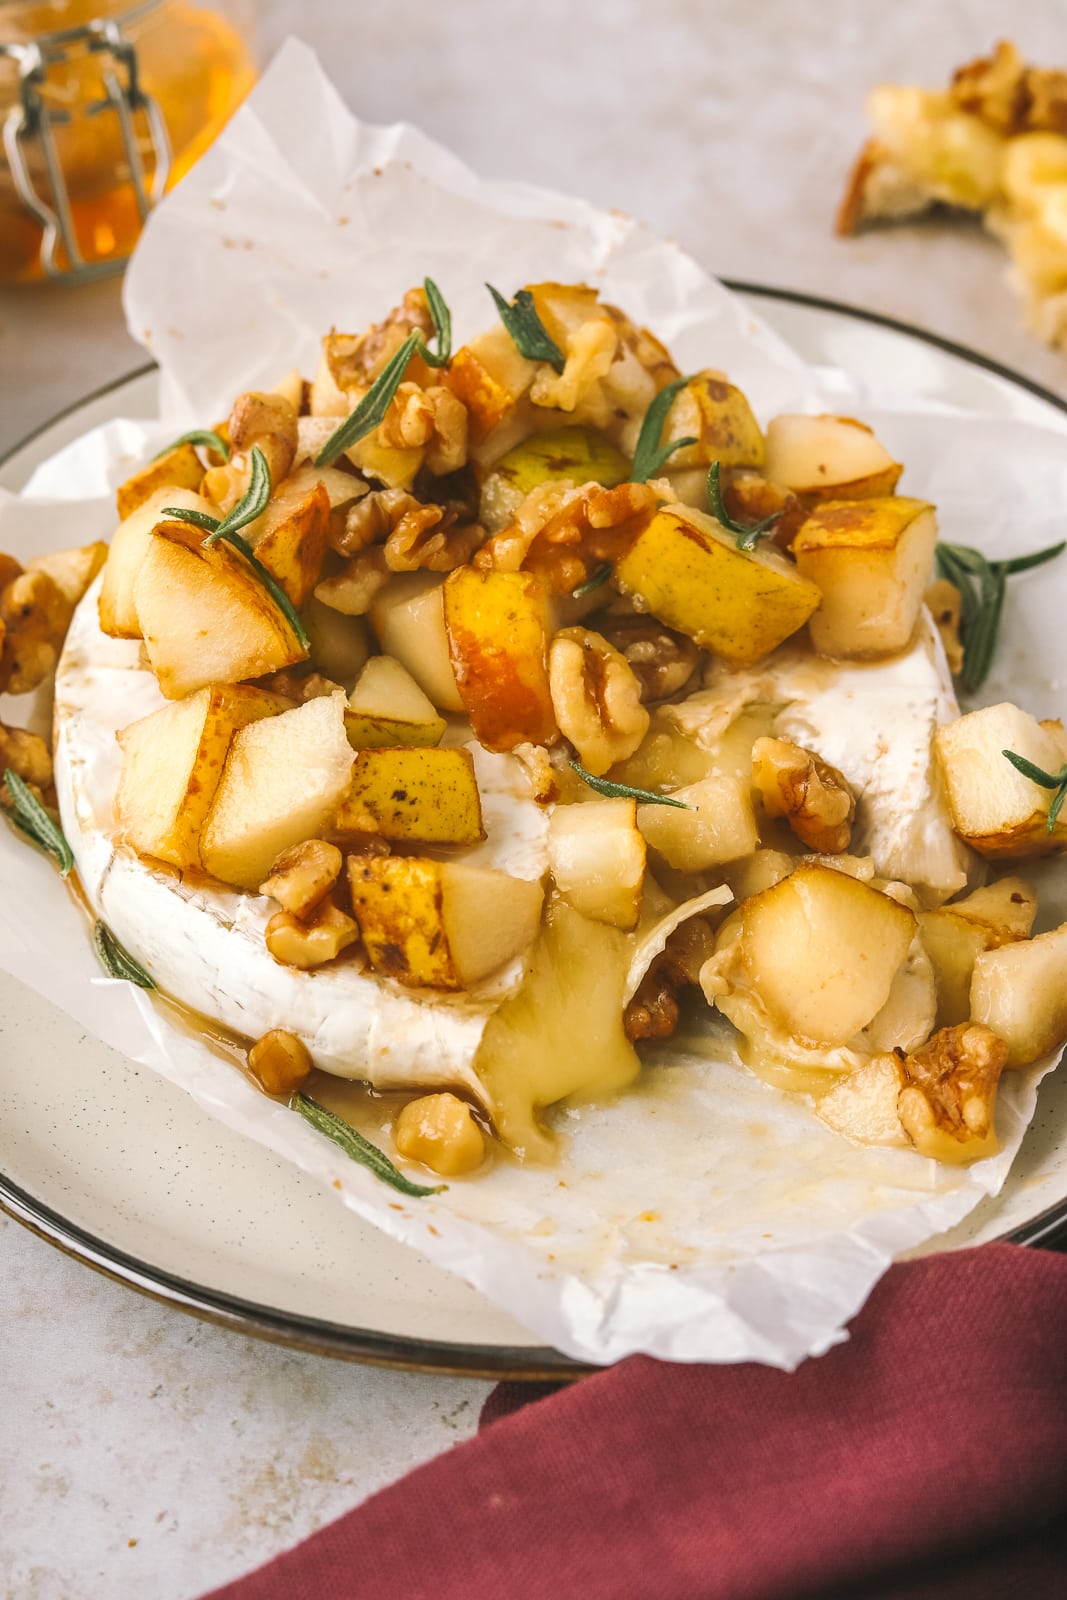
Pear & Walnut Baked Brie


Get ready to impress this holiday season with this pear and walnut baked brie!

This quick and easy baked brie is the perfect holiday appetizer and sure to be a crowd pleaser.
Serve this alongside a charcuterie board!
This baked brie takes just 15 minutes in the oven and 5 minutes to prepare, making it a stellar choice for your holiday get-togethers.
I think this pear and walnut baked brie appetizer would make the perfect showstopper for a holiday cheeseboard. Or if you’re looking for something a bit more simple, I suggest serving with homemade crostini, crackers or even seasonal crudités.

Why you’ll love this pear and walnut baked brie
- It only takes 5 minutes to prep and 15 minutes to bake this quick appetizer!
- You can serve it alongside homemade crostini and crackers, or make it the centerpiece of a cheese board or charcuterie board.
- You only need 6 ingredients to make this holiday appetizer.
- It makes an impressive starter or snack for gatherings!
Ingredients Needed
- Wheel of brie: you can use camembert in a pinch! You don’t need to use an expensive brie for this recipe as it is going to be baked and then topped with the pear and walnut.
- Pear: a key ingredient to this recipe, look for a more ripe pear to use. I love using an Anjou or Bartlett pear as they soften nicely when baked with the brie.
- Honey: if you’re looking to add a bit more sweetness to this, add another drizzle of honey to the baked brie once it comes out of the oven. Feel free to use maple syrup if that’s all you have on hand.
- Rosemary: I recommend garnishing the baked brie with fresh rosemary, but you can use dried rosemary if that is all you have in your pantry.
- Walnuts: I think walnuts pair perfectly with pear and brie, but you could use another nut if you prefer, like pecans or pistachios!

Step by Step Process for this easy baked brie
Step 1: Preheat your oven to 350°Fahrenheit and line a small baking sheet or dish with parchment paper.
Step 2: Place the brie on the baking sheet or in the dish.
Step 3: In a small bowl, mix your chopped pears, chopped walnuts, a pinch of salt and 2-3 tablespoons of honey together. I recommend starting with 2 tablespoons of honey and tasting before adding the third tablespoon.
Step 4: Spoon the topping on top of the brie. Bake the brie for 12-15 minutes, the brie should be warmed through.
Step 5: Transfer the baked brie to a serving plate or board, be careful as it can be quite delicate! I recommend using the parchment paper to move the brie and giving it 5 minutes before moving.
Step 6: Garnish the brie with fresh rosemary and serve with homemade crostini and crackers.

Pear & Walnut Baked Brie
Ingredients
- 250-350 g wheel of brie, unwrapped from packaging
- 1 ripe pear, chopped
- 2-3 tbsp liquid honey
- 1/4 cup chopped walnuts
- pinch salt
- fresh rosemary for garnish
- crostini or crackers for serving
Instructions
- Preheat the oven to 350F. Line a small baking sheet or baking dish with parchment paper.
- Place the brie on the baking sheet or in the baking dish.
- To a bowl add the chopped pears, walnuts, pinch of salt and 2-3 tbsp honey (mix with 2 tbsp first and taste, if you want more honey flavour add another tbsp honey).
- Add the pear-walnut topping to the top of the brie and then bake for 12-15 minutes until the brie is warmed through.
- Carefully transfer to serving plate / board – it's delicate (transfer on parchment paper if you used paper).
- Garnish with fresh rosemary and serve with crostini or crackers
Notes
- If you’d like to add even more sweetness to this baked brie, add an additional drizzle of honey once it comes out of the oven.
- To make things easy on yourself, make sure to bake the brie on parchment paper whether you use a baking dish or baking sheet. This allows you to move the brie to a serving dish much more easily once it’s done baking.
- If moving to a serving dish, make sure to let the baked brie sit for about 5 minutes before moving.

FAQ
Can I eat the rind of the brie?
Yes! You can definitely eat the rind of the brie and I promise it is delicious.
Do I have to remove the rind?
If you removed the rind before baking then the cheese would ooze all over the parchment paper. Plus, leaving the cheese in the rind will create almost a little bowl for your melted cheese, making it easier to scoop out!
How do I make my own crostini?
Preheat your oven to 400°Fahrenheit. Use a bread knife to slice a baguette into 1-inch thick slices. Brush the slices of bread with olive oil on one side and then place in a single layer on a baking sheet. Toast for 10 minutes, flipping the slices of bread halfway through.
What can I serve with this baked brie?
I love serving this appetizer with crostini and crackers, but you could also serve it alongside grapes and crudités like carrots, celery and cucumbers. You can also serve it with slices of baguette. And, I think it would make a stunning centerpiece for a cheese board too!
Expert Tips for making this holiday baked brie
- Make this pear and walnut baked brie the centerpiece of a cheese board or a charcuterie board.
- If you’re going to move the baked brie to a serving dish, let the brie sit for about 5 minutes before moving as it can be delicate.
- To make your life easier I suggest lining a baking sheet or dish with parchment paper. That way you can easily move the parchment paper with the baked brie to your serving plate when you’re ready.
- Add a touch more sweetness to the baked brie by drizzling extra honey on top of the brie once it is out of the oven!
Storage
I recommend eating this appetizer soon after baking it. You can definitely reheat leftovers in the oven or in the microwave if needed!
More holiday appetizers to make from the blog:
Easy Goat Cheese Appetizer with Fig Jam & Pecans
Easy Garlic & Herb Cheese Holiday Appetizer
Until the next cooking adventure,
Jess


")