• Skip to primary navigation
  • Skip to main content
  • Skip to primary sidebar
  • Skip to footer

Cooking in my Genes

  • Home
  • About
  • Recipes
  • Gatherings
  • Free E-Cookbook
  • Contact
    • Privacy Policy
  • Shop

Easy Cheesy Baked Pizza Dip

February 3, 2023 By Jess Leave a Comment

Jump to Recipe Print Recipe
pizza dip appetizer
pizza dip appetizer
pizza dip appetizer
pizza dip appetizer
pizza dip appetizer

This baked pizza dip is the perfect game day recipe!

pizza dip appetizer

This layered dip is topped with gooey cheese and can be made ahead.

Plus, it takes just 5 minutes to prepare!

I love serving this margherita pizza dip with fresh cut veggies, pita chips, or even garlic bread bites! This really is the perfect appetizer to make for a crowd, movie night, or as a game day snack! Plus I love how easy it is to prepare and that you can make this ahead of time.

Why you’ll love this baked pizza dip!

  • It takes just 5 minutes to prepare this oven baked dip and then 20 minutes to bake!
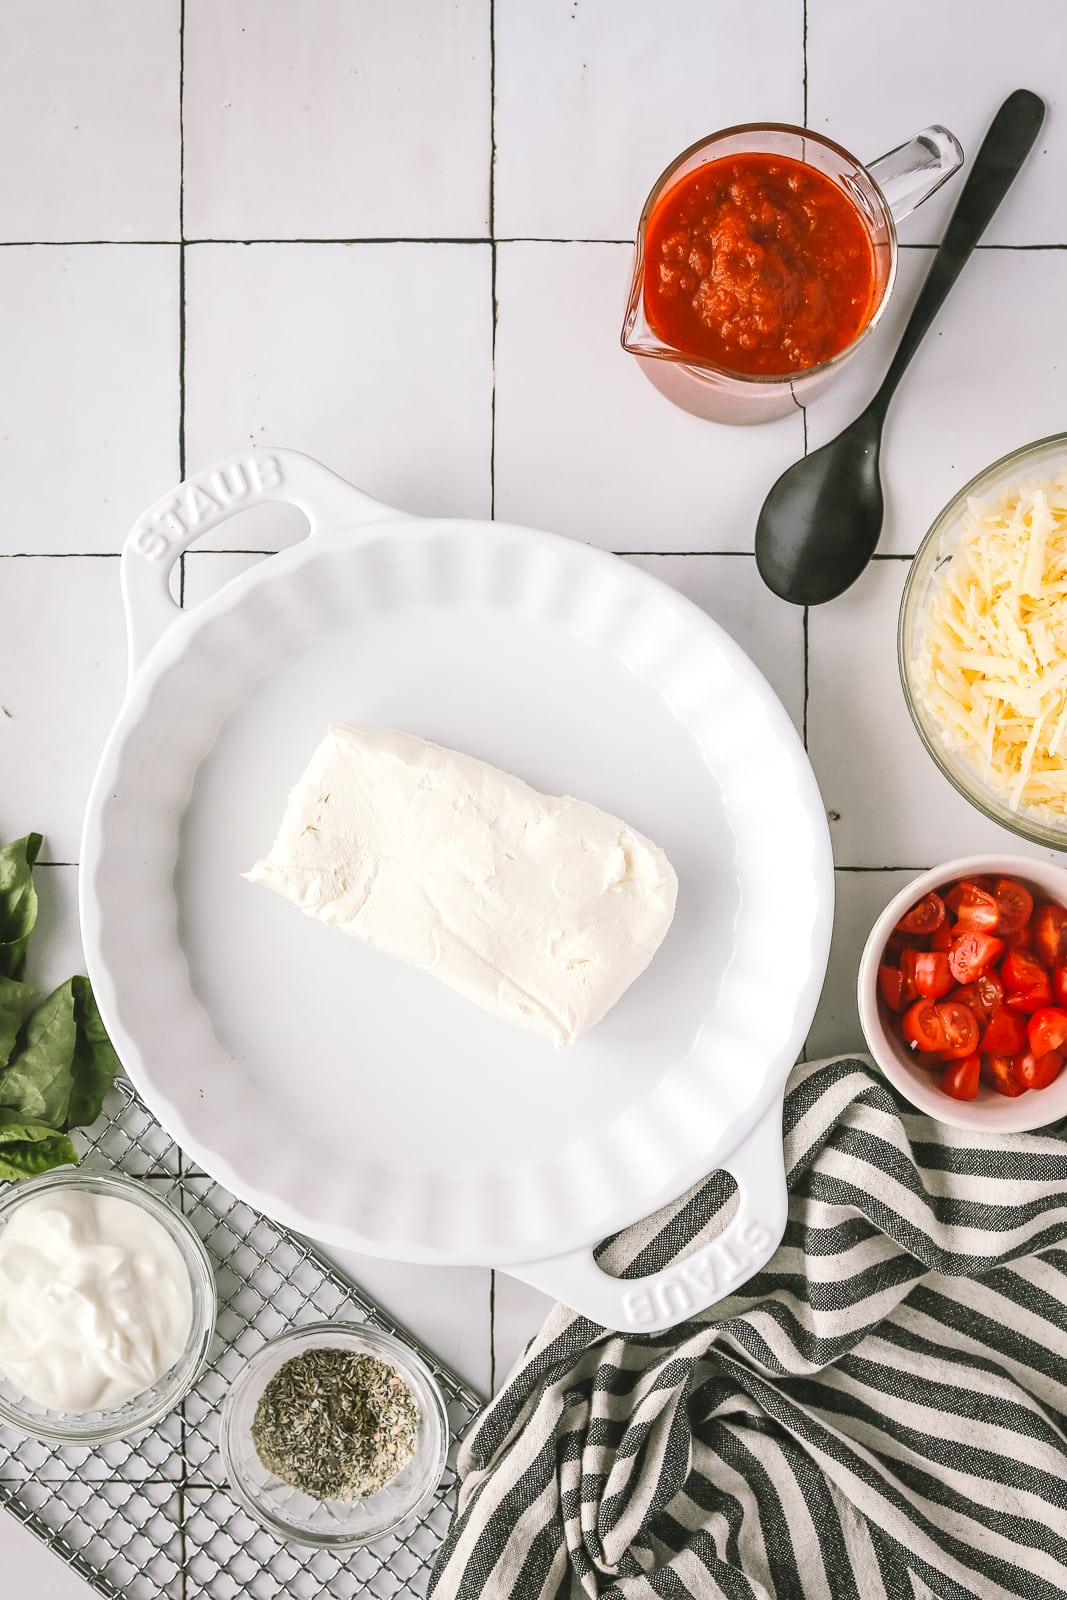
  • This pizza dip is made with simple ingredients like cream cheese, tomato sauce, mozzarella cheese and spices.
  • You don’t have to worry about making pizza dough with this dip recipe, instead we’re focusing on the savory tomato sauce and lots of gooey cheese!
  • This make ahead dip can easily be customized! I love adding pepperoni, mushrooms and sliced bell peppers.

pizza dip appetizer

Ingredients Needed

Cream Cheese: you’ll want the cream cheese to be soft before you start this recipe. If you don’t have time to soften it, add a couple tablespoons of warm milk to help make it spreadable. Alternatively, you can use a hand mixer or stand mixer to whip the cream cheese with the yogurt to get that spreadable texture that we want.

Greek Yogurt: if you don’t have Greek yogurt on hand, feel free to use sour cream or mayonnaise instead!

Marinara Sauce: you can use pizza sauce if you prefer, or if you’re a heat seeker try a spicy jarred tomato sauce.

Cheese: we’re using a combo of mozzarella and parmesan cheese. The cheesier this is, the better!

Spices: this spice blend is really going to amp up the pizza flavour.

Toppings: fresh tomatoes, basil and dried oregano bring the major pizza flavour!

pizza dip appetizer

Step by Step Process for this baked pizza dip

Step 1: Preheat your oven to 400°Fahrenheit.

Step 2: In a 9-inch pie plate (or a similar sized square/rectangular baking dish or cast iron skillet), combine the softened cream cheese, greek yogurt and spices. Spread on the bottom of the dish.

Step 3: Spread 1 cup of tomato sauce on top of the cream cheese mixture.

Step 4: Sprinkle over the mozzarella and parmesan cheese.

Step 5: Then, sprinkle over the chopped tomatoes (or any other toppings!) and ½ teaspoon of dried oregano.

Step 6: Bake in the oven for 20-25 minutes, or until the cheese is bubbling and starting to turn brown. If it isn’t as bubbly as you would like, you can broil on low for 1-3 minutes towards the end of the cooking time.

Step 7: Garnish with fresh chopped basil and enjoy!

pizza dip appetizer

Easy Cheesy Baked Pizza Dip

Course: Appetizer
Cuisine: American
Keyword: dip, pizza
Prep Time: 5 minutes
Cook Time: 25 minutes
Total Time: 30 minutes
Servings: 6

This easy, cheesy baked pizza dip appetizer is the ultimate party food! It's a quick game-day recipe that's sure to be a hit with your guests!

Print

Ingredients

  • 1 250g cream cheese, softened
  • 1/4 cup greek yogurt
  • 3/4 tsp garlic powder
  • 3/4 tsp dried thyme
  • 1 tsp dried oregano
  • 1/4 tsp salt
  • 1/4 tsp chili flakes
  • 1 cup marinara / tomato sauce
  • 1 cup shredded mozzarella cheese
  • 1/4 cup shredded parmesan cheese

For the toppings

  • 1/3 cup cup chopped baby tomatoes (or your choice of additional toppings - see notes for suggestions)
  • 1/2 tsp dried oregano
  • garnish with fresh basil

Instructions

  1. Preheat the oven to 400F.

  2. In a 9 inch pie plate (or similar sized cast iron skillet, square or rectangular baking dish) combine softened cream cheese, greek yogurt and spice blend. Spread on the bottom of the dish.

  3. Spread the 1 cup of marinara / tomato sauce on top of the cream cheese mixture.

  4. Sprinkle over all of the shredded mozzarella cheese and shredded parmesan cheese.

  5. Sprinkle over the fresh chopped tomatoes (or other desired toppings) and ½ tsp dried oregano.

  6. Bake uncovered for 20-25 minutes or until the cheese is bubbly and starting to brown. If needed, you can broil on low for 1-3 minutes at the end of the cooking time to achieve desired bubbly cheese topping.

  7. Garnish with fresh chopped basil and serve warm!

Recipe Notes

  • Want to make this ahead of time? Assemble the dip as instructed and then cover and refrigerate for 1-2 days before baking. When you’re ready to bake the dip, make sure to remove from the fridge for at least 30 minutes before baking according to the instructions.
  • If you don’t have time to soften the cream cheese, use a couple tablespoons of warm milk to help make it a spreadable consistency. Alternatively, use a hand mixer or stand mixer to whip the cream cheese with the yogurt for a spreadable texture.
  • Substitutes for greek yogurt - try sour cream or mayonnaise.
  • You can easily add additional toppings! Try pepperoni, mushrooms, onions, olives, bell peppers or other favorite toppings!
  • Store in the fridge for up to 3 days in an airtight container.

pizza dip appetizer

Expert Tips for making this pizza dip

  • I love this easy appetizer because you can customize it to your liking! Add pepperoni, mushrooms, onions, olives or bell peppers.
  • If you want to use toppings that retain a lot of moisture, like mushrooms or pineapple, I recommend cooking them beforehand or patting dry with a paper towel.
  • Make sure the cream cheese is softened before you start making the dip, otherwise it will be difficult to spread it on the bottom of the dish.
  • I prefer using marinara sauce for this dip, but feel free to use pizza sauce!

pizza dip appetizer

FAQ

How can I make this ahead of time?
Assemble the dip as instructed, then cover and refrigerate for up to 2 days. When ready to bake, take it out of the fridge at least 30 minutes before baking.

I didn’t soften my cream cheese! What should I do?
If you didn’t remember to take your cream cheese out of the fridge ahead of time, I’ve got a few tricks! You can either mix it with a few tablespoons of warm milk to help make it spreadable, or whip the cream cheese with the Greek yogurt in a stand mixer or with a hand mixer to get that spreadable consistency.

What can I serve this with?
Serve this pizza dip with fresh vegetables, bagel chips, pita chips or crostini!

pizza dip appetizer

Storage

Store the baked pizza dip in the fridge for up to 3 days in an airtight container.

More delicious appetizer recipes to love from the blog

Easy Garlic & Herb Cheese Appetizer

Sun Dried Tomato Goat Cheese Pesto Appetizer

Easy Garlic Bread Bites

Until the next cooking adventure,
Jess

Print Friendly, PDF & Email

Filed Under: Appetizer, Recipe Tagged With: appetizer, baked pizza dip, pizza, pizza dip

Previous Post: « One Pot Boursin Pasta
Next Post: The Best Dark Chocolate Cake »

Reader Interactions

Leave a Reply Cancel reply

Your email address will not be published. Required fields are marked *

Recipe Rating


Primary Sidebar

About me

Welcome to Cooking in my Genes. I share my take on recipes I grew up with, foodie adventures & my kitchen creations. About me…

Claim Your Free E-Book Now!

Receive email updates and
my FREE e-cookbook with simple & seasonal recipes.

Let’s Connect

  • Bloglovin
  • Facebook
  • Instagram
  • Pinterest
  • Twitter
  • YouTube

Looking for a recipe?

Recent Posts

  • Easy Lemon & Herb Butter Roasted Turkey
  • Lemon Blueberry Blondies
  • Carrot Cake Oatmeal Pancakes

Recent Comments

  • Jess on Snickerdoodle Blondies
  • Jennifer on Snickerdoodle Blondies
  • Jess on Easy Goat Cheese Appetizer with Fig Jam & Pecans

Archives

Categories

Footer

INSTA-GRATIFICATION

This LAVENDER FRENCH 75 is a gorgeous sip for the This LAVENDER FRENCH 75 is a gorgeous sip for the Spring season! 

It’s light, bubbly and a beautiful colour from my fav @empress1908gin 🥂🥂

Recipes is on the blog friends, link in bio above! 

https://www.cookinginmygenes.com/lavender-french-75-cocktail-recipe/
•
•
•
#gincocktails #homebar #yycfoodblogger #french75 #cocktailsathome #feedfeedcocktails #cocktailrecipes #cookinginmygenes #springcocktails #easyrecipes #winewednesday #winecocktails #sparklingcocktail #proseccococktails #cocktailreels
This BLUEBERRY BASIL GREEN SALAD is made for the S This BLUEBERRY BASIL GREEN SALAD is made for the Spring season! So simple and soooooo much flavour - you could even top it with your favourite protein for a delicious dinner!

Here’s the recipe friends!

Serves 4

INGREDIENTS:
8 cups spring greens or greens of your choice
1 cup fresh blueberries
1/2 cup packed fresh basil leaves, chopped or torn
2/3 cup toasted, sliced or chopped almonds
1/2 cup crumbled goat cheese
1 avocado, pit removed and sliced or chopped

HONEY LEMON VINAIGRETTE
juice and zest of one lemon
2 tbsp liquid honey
1/3 cup extra virgin olive oil
pinch of salt and pepper

INSTRUCTIONS:
1. Toast the sliced or chopped almonds in a small pan of medium-low heat until just golden brown, about 5 minutes. Set aside.
2. Add all of the honey lemon vinaigrette ingredients to a small bowl or mason jar, either whisk the dressing or shake in the mason jar to combine. Set aside.
3. To build the salad add the greens, blueberries, basil and almonds to a bowl. Toss the salad with half of the dressing, taste and add more if desired. Then top with crumbled goat cheese and sliced or chopped avocado.

https://www.cookinginmygenes.com/blueberry-basil-summer-green-salad/
•
•
•
#springsalad #saladrecipe #blueberries #cookinginmygenes #springrecipes #saladbowl #damnthatsdelish #veggierecipes #recipereels #healthyrecipes #easyrecipes #saladbowl #saladideas #blueberrysalad
It doesn’t get better than this DEEP DISH MINI-E It doesn’t get better than this DEEP DISH MINI-EGG COOKIE BOWL. Melty chocolate mini-eggs in a buttery, chewy cookie dough that’s made for one.

You’re going to want to save this recipe for when you’re craving dessert!

Here’s the recipe:

INGREDIENTS:
2 1/2 tbsp unsalted butter
2 1/2 tbsp brown sugar
1 1/2 tbsp white sugar
1x egg yolk
1/2 tsp vanilla extract
6 1/2 tbsp all purpose flour
1/4 tsp baking soda
1/4 tsp salt
3 tbsp chopped chocolate mini-eggs (or chocolate chips)

INSTRUCTIONS:
1. Preheat the oven to 350F. To a small-medium size bowl add melted butter, brown sugar and white sugar. Whisk together to combine.
2. Add egg yolk and vanilla and whisk again to combine.
3. Add in flour, baking soda and salt and stir until a cookie dough forms. Mix in the chopped chocolate mini-eggs and press the dough into a 8-10oz ramekin. 
4. Bake in the oven 18-24 minutes depending on preferred doneness (16-18 minutes range will be a more ‘underdone’ cookie VS 24 minutes will be almost fully baked)
5. Enjoy!
•
•
•
#minieggs #cookinginmygenes #easterrecipes #singleservingdessert #springbaking #thebakefeed #eastercookies #minieggcookies #bakingrecipes #bakingvideo #cookieskillet #cookiecake #chocolatechipcookie #dessertforone
It takes only 5 ingredients to make this ROASTED S It takes only 5 ingredients to make this ROASTED STRAWBERRY APPETIZER! 

Strawberries are roasted with balsamic and maple syrup and then used to top cracked black pepper Boursin cheese. Add a little basil for garnish and serve with crostini - that’s it. It’s the perfect hit of sweet and savoury for the Spring (then summer) season!

You can also easily double this recipe to make it for more people too. 

Here’s the recipe friends!

Serves: 3-4
Prep Time: 5 minutes
Cook Time: 20 minutes

INGREDIENTS:
1 1/2 tbsp balsamic vinegar
1 tbsp maple syrup or honey
2 cups fresh strawberries, quartered
1x 150g Boursin Cracked Black Pepper Cheese (remove from fridge 10 minutes before making the dip)
Fresh basil for garnish
Crostini or crackers for serving

INSTRUCTIONS:
1. Preheat the oven to 350F.
2. Add quartered strawberries to a parchment lined baking sheet along with balsamic vinegar and maple syrup. Stir together and then roast for 20-25 minutes until just softened and the strawberry juices start to release. Set aside to cool.
3. When you’re ready to serve the appetizer, spread the Boursin cheese on a low plate or bowl and then top with roasted strawberries and fresh basil.
4. Serve with crackers or crostini. Enjoy!
•
•
•
#cookinginmygenes #springrecipes #entertainingathome #strawberryseason #appetizerideas #appetizerrecipe #cheeseplate #cheeseboard #recipereels #boursinbites #easyappetizers #crostini #budgetfriendlyrecipes #strawberryrecipes
These PEANUT CHICKEN BOWLS are a go-to lunch or di These PEANUT CHICKEN BOWLS are a go-to lunch or dinner for me because you can use whatever ingredients you’ve got on hand! 

It’s easy to mix & match your favourite veggies and grains, then just add your protein of choice (I like to use a cooked rotisserie chicken from the market since it makes this recipe so quick!)

Here’s how to make 2 servings - 

INGREDIENTS:

For the Peanut Chicken Bowls:
1-1 1/2 cups cooked chicken (or other protein of choice)
1/2-1 cup cooked grains of choice 
1 carrot, grated 
1/2 cup chopped cucumber 
1/2 bell pepper chopped
1/2-1 cup red cabbage, sliced thin
Mint for garnish

For the Peanut Sauce:
1/2 cup peanut butter
2 1/2 tbsp soy sauce or tamari 
Juice from half a lime
1 1/2 tbsp sriracha or other hot sauce of choice 
1 tsp fresh grated ginger 
1/4-1/3 cup hot water 

INSTRUCTIONS:
1. To make the peanut sauce, whisk together peanut butter, soy sauce, lime juice, sriracha, ginger and 1/4 - 1/3 cup hot water and set aside.
2. Divide the peanut chicken bowl ingredients between two bowls, drizzle with peanut sauce and enjoy!

Recipe is also on the blog if you desire - linked in my profile above!

https://www.cookinginmygenes.com/peanut-chicken-power-bowls/
•
•
•
#easydinnerideas #peanutchicken #healthybowls #veggierecipes #dinnerrecipes #recipevideo #damnthatsdelish #cookinginmygenes #mealprepdaily #30minutemeals #dinnerinspo #healthyrecipes #weeknightdinner #chickendinner
Let’s make this simple SPRING TORTELLINI SALAD! Let’s make this simple SPRING TORTELLINI SALAD! 

This recipe is perfect for a simple weeknight dinner; easy to meal prep for lunch; or, make it for a brunch. 

INGREDIENTS NEEDED:
*cheese tortellini
*arugula
*fresh or frozen peas
*mixed herbs
*parmesan cheese
*olive oil
*lemon
*garlic
*dried herbs
*salt & pepper

Full recipe & directions can be found on the blog, linked in my profile above friends!

https://www.cookinginmygenes.com/easy-summer-tortellini-pasta-salad/
•
•
•
#cookinginmygenes #pastasalad #springrecipes #easterrecipes #tortellini #easydinnerrecipes #recipevideo #mealpreprecipes #veggierecipes #30minutemeals #tortellinisalad #springsalad #saladrecipe
It’s time to bake allll the Spring recipes like It’s time to bake allll the Spring recipes like these LEMON BLUEBERRY BLONDIES! 

These one-bowl Blondies are tender, packed with lemon flavour and fresh blueberries PLUS a white chocolate drizzle. It doesn’t get any better - here’s the recipe friends!

INGREDIENTS:
1/2 cup unsalted butter, melted
3/4 cup white sugar
1/4 cup brown sugar
1 egg
1 tsp vanilla extract
zest from 1 lemon (2 tsp lemon zest)
1 1/4 cup all purpose flour
1 tsp baking powder
1/4 tsp salt
3/4 cup fresh blueberries
optional white chocolate drizzle: 1/2 cup white chocolate chips melted

INSTRUCTIONS:
1. Preheat oven to 350F and line an 8x8 pan with parchment paper. 
2. In a mixing bowl, whisk together melted butter, white and brown sugar until combined. Add the egg and vanilla extract and mix well. Whisk in the lemon zest.
3. Using a spoon or spatula, mix flour, baking powder and salt into wet ingredients, stirring until everything comes together and no clumps of flour remain (it will be quite thick like cookie dough). Gently stir in the blueberries.
4. Transfer the batter into the prepared pan and smooth out the top so the batter reaches the edges of the pan.
5. Bake for 25-30 minutes or until a toothpick inserted in the center comes out clean. Cool completely in the pan and then remove and cut into 9 or 12 squares.  Drizzle with melted white chocolate and enjoy!
•
•
•
#lemonblueberry #cookinginmygenes #thebakefeed #springbaking #blondies #blueberrydessert #blueberries #easyrecipes #onebowlbaking #bakedfromscratch #cookiebar #dessertbar #blueberrylemon #feedfeedbaking #bakingrecipes #recipereels
I love to bake on the weekend so I’m popping the I love to bake on the weekend so I’m popping these ONE BOWL CHOCOLATE CHIP OATMEAL COOKIES in the oven!

Made in just one bowl, these chewy, chocolatey cookies are made for weekend dessert or snacks. 

Recipe is on the blog friends, link is in my profile above!

https://www.cookinginmygenes.com/one-bowl-oatmeal-chocolate-chip-cookies/
•
•
•
#thebakefeed #weekendbaking #cookinginmygenes #chocolatechipcookies #onebowlbaking #bakedfromscratch #imsomartha #feedfeedbaking #cookieshomemade #oatmealcookies #cookierecipe #easycookies
Follow on Instagram

Copyright © 2023 · CookinginmyGenes.com