• Skip to primary navigation
  • Skip to main content
  • Skip to primary sidebar
  • Skip to footer

Cooking in my Genes

  • Home
  • About
  • Recipes
  • Gatherings
  • Free E-Cookbook
  • Contact
    • Privacy Policy
  • Shop

Easy Cauliflower Tacos

February 8, 2020 By Jess 13 Comments

Jump to Recipe Print Recipe

Hand’s up if you love Taco Tuesdays!

Easy Cauliflower Tacos
Well, here’s an easy and delicious recipe perfect for Tuesday or any weeknight meal.

These Easy Cauliflower Tacos are made in just 30 minutes so they’re a quick and delicious option for dinner.

What can you put in tacos instead of meat?

In this case, cauliflower works wonders! It provides the texture you want for a plant-based dinner option.

We’ve been including 2 plant-based or vegetarian meals into our dinner plans each week and these tacos are one of our go-to recipes.  They’re easy to make when you want a quick, healthy dinner!

Easy Cauliflower Tacos
How to make cauliflower tacos

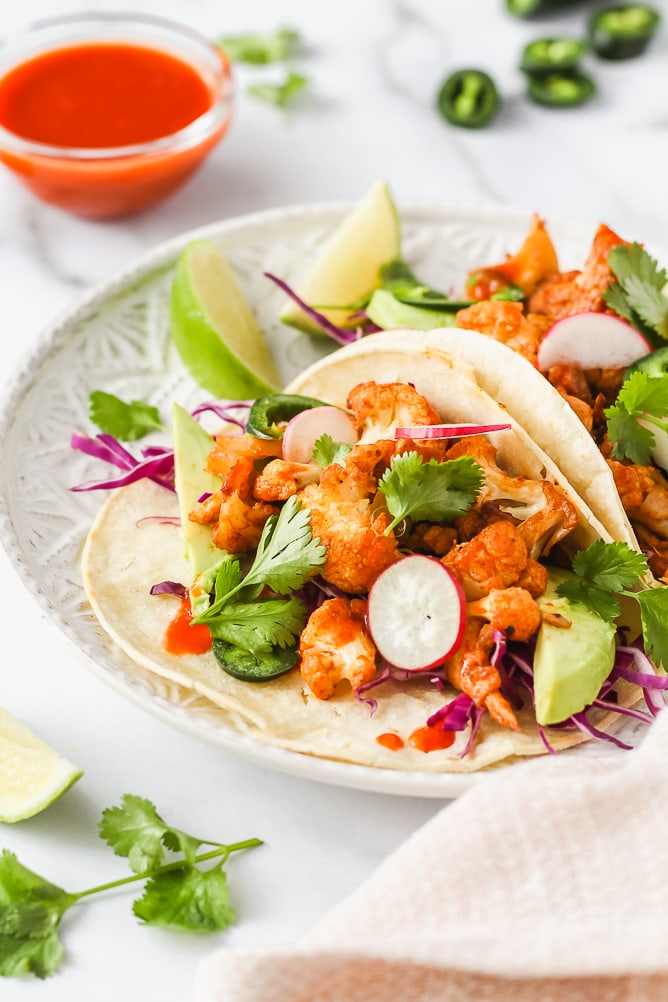
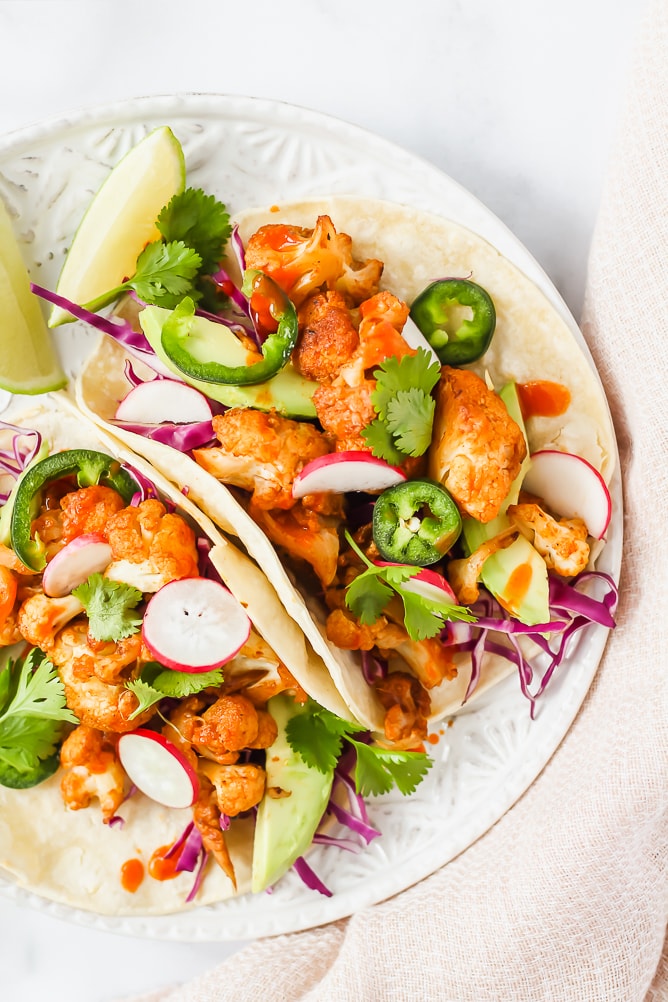
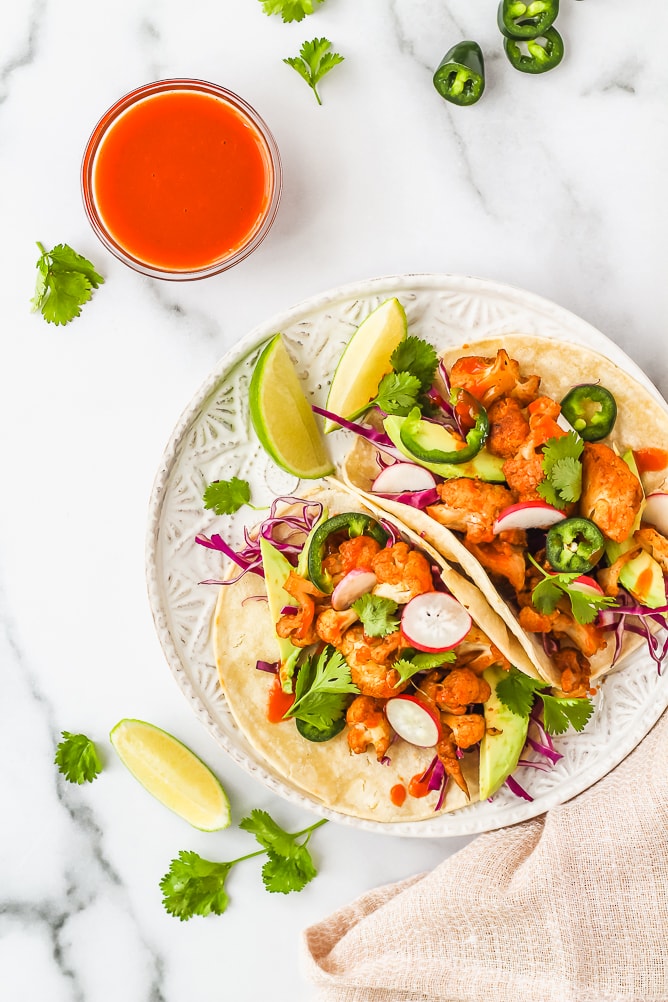
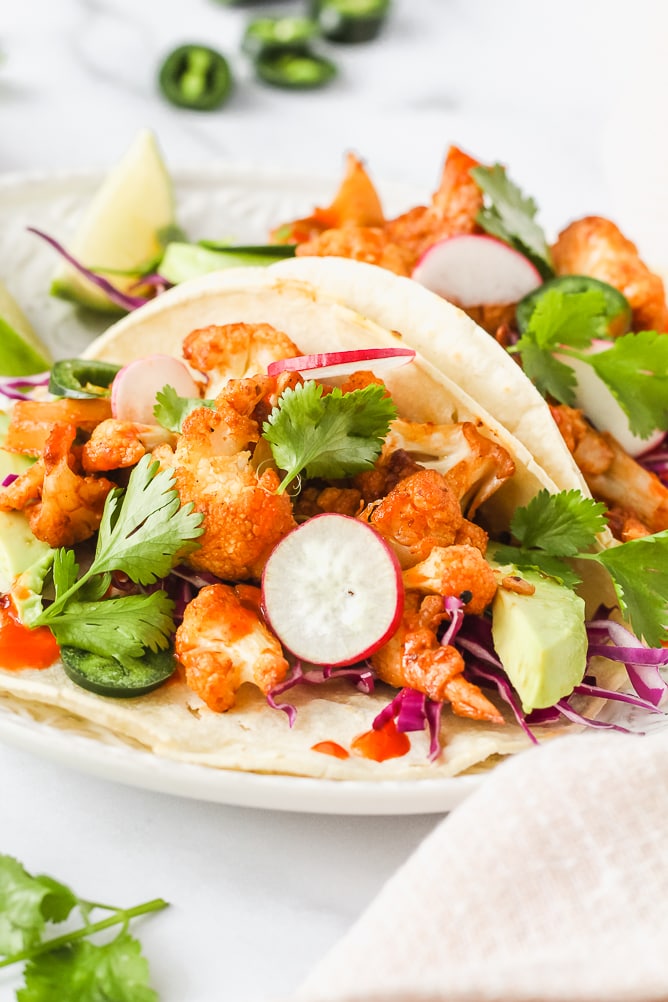
Cauliflower:  A delicious and easy option, cauliflower is sautéed until a bit browned but still has a bit of a bite to it. Mixed with hot sauce for a delicious taco filling!

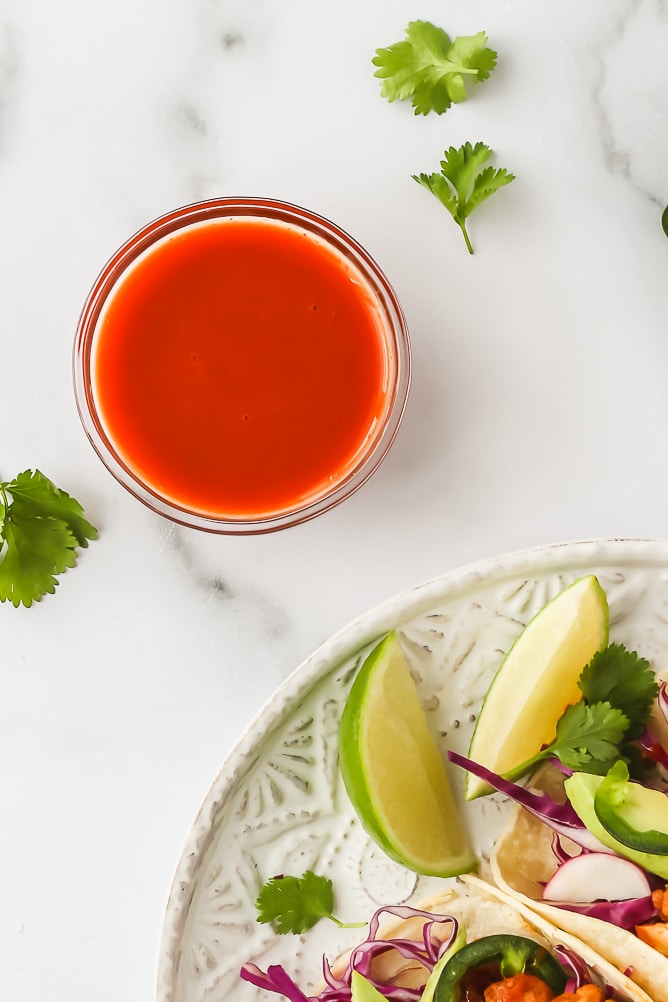
Hot Sauce: You can use your favourite hot sauce for this recipe so it’s easy to control how mild or spicy the dish is. I love a regular hot sauce like Frank’s or try a chipotle flavoured sauce for a bit of a smokier chile flavour.

Easy Cauliflower Tacos

Tortillas: I like to use small corn tortillas but you can use whatever type of tortillas you enjoy most. Warm them in a pan or in the oven before serving.

Toppings: Top tacos with your choice of red cabbage, jalapeños, avocado, cilantro, radishes, lime or more hot sauce if you’d like!

Here’s the thing, you can mix and match whatever toppings you like based on your tastes! Just choose the toppings you like most.

Easy Cauliflower Tacos

Easy Cauliflower Tacos

Course: Main Course
Cuisine: American
Keyword: cauliflower tacos, tacos, vegetarian
Prep Time: 10 minutes
Cook Time: 20 minutes
Total Time: 30 minutes
Servings: 8 tacos

These colourful and easy cauliflower tacos are a delicious plant-based meal. Make this satisfying and healthy dish for Taco Tuesday or any weeknight meal!

Print

Ingredients

  • 1 large head cauliflower cut into small florets
  • 2 tbsp extra virgin olive oil
  • 1/2 tsp garlic powder
  • 1/2 tsp kosher salt
  • ground pepper
  • 1/2 cup hot sauce
  • 8 tortillas

Toppings (mix & match depending on your tastes)

  • 1-2 cups shredded cabbage
  • 1 jalapeno, slicied
  • 1 avocado, sliced
  • 1 bunch of cilantro, chopped
  • 2-3 radishes, sliced
  • 1 lime, sliced

Instructions

  1. In a large frying pan set to medium-high heat, add 2 tbsp olive oil. Add in cauliflower and season with salt, pepper and garlic powder.

  2. Cook cauliflower for 15-20 minutes, stirring occasionally, until browned and it reaches your desired consistency (I like it to still have a slight crunch). Tip: if the pan gets too hot (cauliflower is browning too much) turn to medium heat until desired consistency is reached.

  3. As the cauliflower is cooking, prep your toppings: slice cabbage, jalapenos, avocados, cilantro, radishes and limes.

  4. Once cauliflower is done cooking, taste and season cauliflower once more if needed with salt and pepper, then stir in hot sauce to finish.

  5. Make the tacos! Warm up the tortillas in a pan, the microwave or in the oven until pliable. Then serve with cauliflower and all the toppings. Squeeze lime juice on the tacos as a finising touch before enjoying!

Easy Cauliflower Tacos

Seriously, these tacos are so satisfying. I first shared this recipe on Instagram and one avid reader has sent me a couple of photos saying they make these cauliflower tacos EVERY WEEK!

So, if you’re looking to add some more plant-based meals into your dinner rotation, these tacos might just do the trick.

Easy Cauliflower Tacos
Looking for other plant-based meal options? Try my Chickpea Taco Bowls or one of my soup recipes.

Until the next cooking adventure,
Jess

Print Friendly, PDF & Email

Filed Under: Main Course, Recipe Tagged With: cauliflower, plant-based, taco, taco tuesday, tacos, vegetarian

Previous Post: « What’s In Season – Recipes to Make in February
Next Post: Decadent Hot Chocolate Bar »

Reader Interactions

Comments

  1. Katherine | Love In My Oven

    February 13, 2020 at 1:52 pm

    I always giggle a little when I see cauliflower tacos, because once I made them and had told my husband I was making “tacos” and he was all excited to come home for dinner…then saw that they were cauliflower tacos. He was so disappointed, hah! But he ended up loving them. And I loved them too, so I KNOW these would be a hit!

    Reply
    • Jess

      February 13, 2020 at 3:19 pm

      Such a funny story! I feel I may have also done this to my husband at one point too 🙂 BUT he now loves this recipe too!

      Reply
  2. Yvonne Langen

    February 13, 2020 at 2:46 am

    I love a veggie alternative that tastes as decadent and filling as the meaty original. These cauliflower tacos are no exception!

    Reply
    • Jess

      February 13, 2020 at 3:19 pm

      Thanks for the recipe love Yvonne! And you’re so right; the cauliflower has that same kind of ‘meatiness’ to it too!

      Reply
  3. Shailaja desai

    February 12, 2020 at 8:50 am

    This is a great idea instead of meat.. would love to give it a try sometime.. great clicks too

    Reply
    • Jess

      February 13, 2020 at 3:20 pm

      Love to hear you’re going to try them sometime! I hope you enjoy the recipe 🙂

      Reply
  4. Colleen

    February 12, 2020 at 6:54 am

    We are also having 2-3 meatless dinners per week, easing into more. So these tacos are a perfect addition. Thanks for this delicious recipe!

    Reply
    • Jess

      February 13, 2020 at 3:20 pm

      Love to hear that Colleen! I hope you enjoy the recipe for an upcoming meatless dinner too 🙂

      Reply
  5. Nicoletta

    February 12, 2020 at 12:33 am

    The colors of these tacos are gorgeous, the texture is amazing, and I cannot wait to try them! Cauliflower is so good and good for you, this recipe is definitely a keeper!

    Reply
    • Jess

      February 13, 2020 at 3:21 pm

      Thanks for the recipe love Nicoletta! I hope you enjoy the recipe; they bring some serious colour to dinnertime 🙂

      Reply

Trackbacks

  1. Easy Cauliflower Tacos – Naturally Prepared says:
    October 12, 2020 at 5:11 pm

    […] https://www.cookinginmygenes.com/easy-cauliflower-tacos/ […]

    Reply
  2. What's In Season - Recipes to Make in June - Cooking in my Genes says:
    June 8, 2020 at 9:26 pm

    […] to go outside and pick what I need for the recipe I’m cooking. Whether its jalapeños for tacos, herbs for making cocktails or carrots towards the end of summer, it’s so neat to enjoy the […]

    Reply
  3. What's In Season - Recipes to Make in March - Cooking in my Genes says:
    February 29, 2020 at 5:50 pm

    […] Cabbage – Easy Cauliflower Tacos […]

    Reply

Leave a Reply Cancel reply

Your email address will not be published. Required fields are marked *

Recipe Rating


Primary Sidebar

About me

Welcome to Cooking in my Genes. I share my take on recipes I grew up with, foodie adventures & my kitchen creations. About me…

Claim Your Free E-Book Now!

Receive email updates and
my FREE e-cookbook with simple & seasonal recipes.

Let’s Connect

  • Bloglovin
  • Facebook
  • Instagram
  • Pinterest
  • Twitter
  • YouTube

Looking for a recipe?

Recent Posts

  • Sun Dried Tomato Goat Cheese Pesto Appetizer
  • The Best Creamy Potato Soup
  • Tropical Blood Orange Smoothie

Recent Comments

  • Jess on Baked Pears with Cardamom Cream
  • Gramy T on Baked Pears with Cardamom Cream
  • Jess on Easy Goat Cheese Appetizer with Fig Jam & Pecans

Archives

Categories

Footer

INSTA-GRATIFICATION

These are my favourite QUICK & EASY PEANUT NOODLES These are my favourite QUICK & EASY PEANUT NOODLES. Perfect for a quick weeknight meal or lunch on the weekend here’s how to make them:

INGREDIENTS:
80-90g / 3-4oz dry noodles
1/4 cup peanut butter
1 tbsp soy sauce or tamari
1 tbsp chili garlic sauce 
1 garlic clove, grated
Juice from a quarter of a lime
2 tbsp - 1/4 cup pasta water 
Optional add-ins: chicken, peas, broccoli or shredded carrots

INSTRUCTIONS:
1. Cook pasta according to package directions and reserve 1/4 cup pasta water.
2. Whisk together peanut butter, soy sauce, chili sauce, grated garlic, lime juice and 2 tbsp pasta water. Stir until sauce is fully combined and add another 2 tbsp pasta water to loosen further if needed. 
3. Stir in noodles and other add-ins. Enjoy!
•
•
•
#weeknightdinner #quickrecipes #quickdinner #cookinginmygenes #peanutnoodles #quicknoodles #saucynoodles #easyrecipes #recipereels #dinnerideas #yycfoodblogger #dinnerinspiration
The coziest cocktail for our very wintery weekend, The coziest cocktail for our very wintery weekend, this WINTER SPICED OLD FASHIONED is still one I always come back to. 

Made with a spiced simple syrup, it brings lovely warming notes to this Wintry sip. 

Recipe is on the blog friends! Linked in bio above 

https://www.cookinginmygenes.com/winter-spiced-old-fashioned-cocktail/
•
•
•
#cookinginmygenes #yycfoodblogger #foodphotographyandstyling #foodtographyschool #wintercocktails #easycocktails #feedfeedcocktails #foodcontentcreator #bourboncocktails #oldfashioned #cocktailsathome #cocktailrecipes
Here’s a quick 20-MINUTE ONE POT BOURSIN PASTA t Here’s a quick 20-MINUTE ONE POT BOURSIN PASTA that you can make any day of the week. 

It’s creamy, packed with flavour and easy to make!

Here’s the recipe friends:

Total Time: 20 minutes
Equipment: large pot
Servings: 2-3

INGREDIENTS:
200-250g dry rigatoni (or other pasta shape)
1x (5.2 ounce/150g) package Boursin Fine Herbs & Garlic cheese
Zest from 1 lemon plus more for garnish
1 tbsp lemon juice
¼ tsp chili flakes
¼ tsp ground pepper
1 cup frozen peas
¾ cup shredded parmesan cheese
Salt and pepper to taste
Garnish with lemon zest, chili flakes, parmesan cheese

INSTRUCTIONS:
1. Bring a large pot of salted water to a boil. Once boiling, add pasta and cook according to package directions. Reserve 1 cup pasta water and then drain the pasta.
2. Add the drained pasta back to the pot and set over low heat on the oven.
3. Immediately add in the Boursin cheese, lemon zest, lemon juice, chili flakes, ground pepper, frozen peas and shredded parmesan cheese. 
4. Start stirring together and gradually add in ¼ cup pasta water; keep stirring to create a creamy sauce that clings to the noodles.
5. Taste and adjust seasoning with salt and pepper. Make sure the peas are warmed through - if not keep on low heat and stir occasionally until they are.
6. Lastly, if you want a creamier sauce, add in an additional ¼ cup pasta water. (I generally use ½ cup pasta water total).
7. Enjoy immediately topped with more lemon zest, chili flakes and parmesan cheese if desired.
•
•
•
#onepotpasta #onepotmeals #easydinner #dinnerideas #cookinginmygenes #yycfoodblogger #boursincheese #boursinpasta #recipereels #veggierecipes #dinnerinspiration #comfortfoodie #weeknightmeals #quickrecipe #quickdinner
If you want to escape to the tropics, try my TROPI If you want to escape to the tropics, try my TROPICAL SLUSHIE! Easily made as a mocktail or a cocktail, it’s perfect to brighten things up this winter. 

All you need is:
*frozen mango
*frozen pineapple 
*maple syrup
*lime
*ice
*rum (if desired)

Get the recipe on the blog! Linked in bio above. 

https://www.cookinginmygenes.com/tropical-rum-slushie/
•
•
•
#cookinginmygenes #yycfoodblogger #mocktails #mocktailrecipe #drinkrecipes #happyhourathome #wintermocktail #cocktailrecipe #tropicaldrink #foodphotographyandstyling #easyrecipes
You need this Quick Asparagus Gnocchi in your life You need this Quick Asparagus Gnocchi in your life! Made in under 25 minutes, it’s the perfect weeknight meal - save this post for the recipe!

Here it is:

INGREDIENTS:
1 lb store bought gnocchi
3 tbsp butter, divided
1 bunch asparagus, trimmed ends and cut into 1 inch pieces
1/2 lemon
2 tbsp pesto sauce
1/2 cup shredded parmesan cheese
kosher salt and ground pepper
Extra garnish: red pepper flakes

INSTRUCTIONS
1. If required by the instructions on the gnocchi you’ve purchased, boil and drain the gnocchi then set aside.
2. Heat a large frying pan over medium-high heat, add 2 tbsp butter. Add the gnocchi and sauté 5-8 minutes, until starting to turn golden brown.
3. Add in asparagus pieces, 1 tbsp butter, juice from half a lemon and a big pinch of both salt and ground pepper. Cook, stirring often, until the asparagus is fork tender and still has a bit of a bite, about 3-5 minutes.
4. Turn off the heat and stir in 2 tbsp pesto plus half of the parmesan cheese. Taste and adjust seasoning with more pesto, salt and pepper and red pepper flakes if you choose. Use the rest of the parmesan cheese as garnish. Serve immediately. 

https://www.cookinginmygenes.com/quick-spring-gnocchi-with-asparagus/
•
•
•
#30minutemeals #gnocchirecipe #weeknightmeals #cookinginmygenes #yycfoodblogger #recipeshare #dinnerrecipes #damnthatsdelish #makesmewhole #eatyourcolors #vegetarianmeals #onepandinner #meatlessmonday #quickdinner
Friends, I’ve got another deliciously easy dip f Friends, I’ve got another deliciously easy dip for you! It’s so easy to make AND simple to add in your fav ingredients too. 

Here’s how to make it:
150-200g softened goat cheese (or cream cheese or even hummus!)
1/3 cup chopped cucumbers
1/3 cup chopped sundried tomatoes 
1/4 cup chopped walnuts
2-4 tbsp pesto 
Toppings: drizzle olive oil, chili flakes, fresh basil

Spread softened goat cheese on a plate. Swirl pesto into the goat cheese. Sprinkle over the cucumbers, sundried tomatoes and walnuts. Drizzle with olive oil and a pinch chili flakes. Top with fresh basil. (Other delicious add-ons could be olives, capers, balsamic glaze drizzle). 

https://www.cookinginmygenes.com/goat-cheese-pesto-appetizer/
•
•
•
#goatcheese #cookinginmygenes #easyappetizers #fingerfood #cheeseplate #cheeseboards #crostini #creamcheese #toasties #toastideas #damnthatsdelish #meatlessmeals #recipevideo #entertainingathome #cheesedip
This is one of my favourite ways to make salads in This is one of my favourite ways to make salads in the winter - ROAST some fav veggies together and then add them to salad greens, topped with feta, walnuts and a balsamic dressing. 

The best part is you can mix and match what you like so carrots would be delish, chopped almonds or goat cheese are great substitutes. 

Here’s generally how I make it:

1 large sweet potato, cubed
4 golden beets, peeled and cubed
12 Brussels sprouts, quartered 
Olive oil
Salt & pepper
Salad greens
Chopped walnuts
Feta 

Dressing: Mix together 1/4 cup olive oil, 3 tbsp balsamic vinegar, 2 tbsp maple syrup, 1x garlic clove minced, salt and pepper 

Toss the vegetables with a couple tablespoons olive oil and season generously with salt and pepper. Roast at 415 F for 30-35 minutes or until done to your liking. Add veggies to your favourite salad greens and top with nuts, cheese and dressing. 
•
•
•
#easysalad #saladrecipe #cookinginmygenes #yycfoodblogger #roastedveggies #wintersalad #dinnerrecipes #healthyinspo #plantpower #recipereels #mealprepideas #saladbowl #healthymealprep #iamwellandgood
You neeeed this CREAMY POTATO SOUP WITH CHIVES & C You neeeed this CREAMY POTATO SOUP WITH CHIVES & CHIPS on your Winter menu!

It’s creamy, cozy and tastes like the best baked potato you’ve ever had topped with cheddar, chives and chips (my fav is Ruffles Sour Cream & Onion!) for the perfect crunch.

Here’s the recipe friends:

INGREDIENTS:
2 tbsp olive oil
1 small yellow onion, diced
3 garlic cloves, minced
1 tsp dried thyme
½ tsp salt
Ground pepper
Pinch chili flakes
1x 340mL navy or cannellini beans (drained and rinsed)
4 cups chopped & peeled yellow potatoes
6 cups vegetable or chicken broth
1 cup shredded white cheddar cheese plus more for garnish
Toppings: Minced chives & Sour cream or plain ruffle chips

INSTRUCTIONS:
1. In a large pot, add oil over medium heat. Add onions and cook until softened, about 5-7 minutes. 
2. To the pot add minced garlic, dried thyme, coarse salt, a couple turns of ground pepper and a pinch of chili flakes. Stir and cook for 2 more minutes. 
3. Add the potatoes, beans and broth, stir and bring the soup to a boil over high heat. Once boiling, turn down to medium-low heat and simmer for 20-25 minutes until potatoes have softened / are fork tender. 
4. Remove the pot from the heat. 
5. Use a hand blender to blend the soup right in the pot. Or transfer 2 cups at a time to a stand blender to blend until smooth then return the soup to the pot. Adjust seasoning to your liking with more salt and pepper; add more broth if too thick; and then stir in 1 cup of shredded white cheddar.
6. Serve topped with crushed ruffle sour cream and onion chips, minced chives and shredded cheese. Enjoy!
•
•
•
#souprecipe #potatochips #potatorecipes #creamypotatosoup #potatosoup #yycfoodblogger #grilledcheese #recipereels #bakedpotatosoup #onepotrecipe #meatlessmeals #soupfordinner #comfortfood
Follow on Instagram

Copyright © 2023 · CookinginmyGenes.com