• Skip to primary navigation
  • Skip to main content
  • Skip to primary sidebar
  • Skip to footer

Cooking in my Genes

  • Home
  • About
  • Recipes
  • Gatherings
  • Free E-Cookbook
  • Contact
    • Privacy Policy
  • Shop

Easy Breakfast Tacos

April 18, 2020 By Jess 12 Comments

Jump to Recipe Print Recipe
Easy Breakfast Tacos

Right now, there’s nothing better than these Easy Breakfast Tacos!


Using just a couple of ingredients that you have in your fridge, you can easily make this recipe.

Mix and match to create your perfect Breakfast Taco (which are also great to make for brunch or dinner!)


When we were kids my Mom would make us breakfast tacos on the weekend, especially if we had leftovers from tacos during the week.

It is a GREAT way to use up a variety of vegetables in the fridge or taco leftovers. I love this recipe because it really is a ‘choose your own adventure.’ Use whichever ingredients are your favourite!


My favourite way to make these tacos is leaning towards other ingredients I like to eat with breakfast like sweet potato and avocado. So really, let your personal tastes guide you.

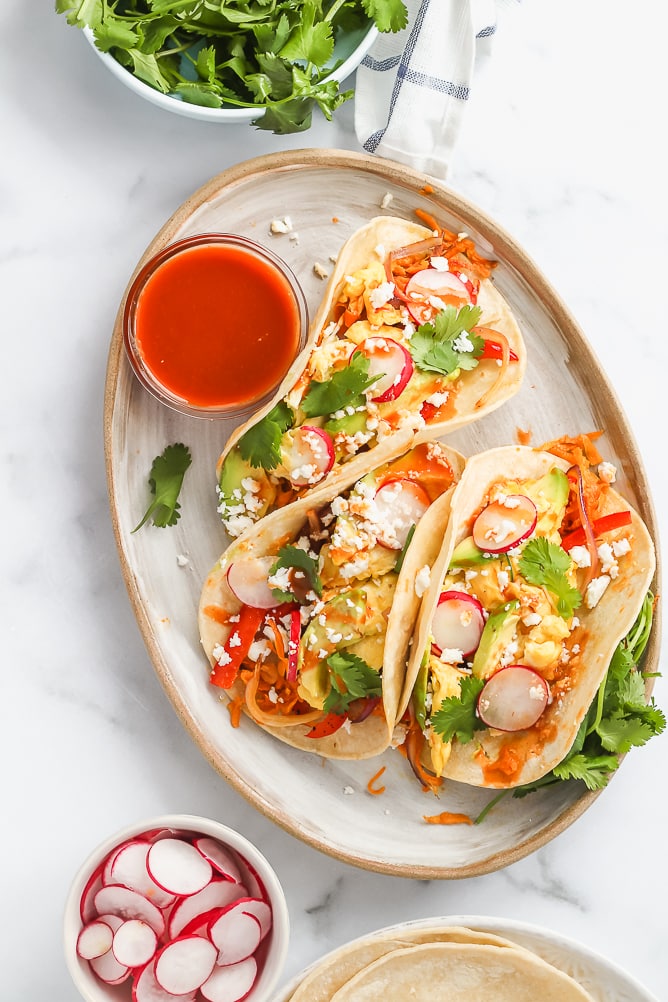
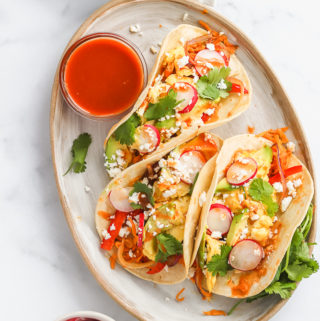
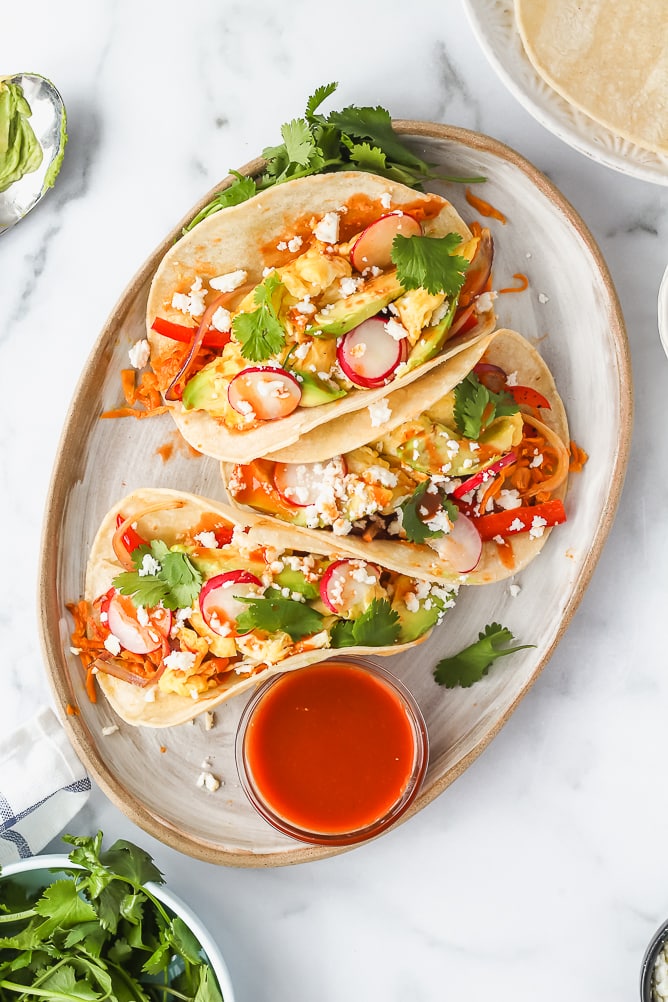
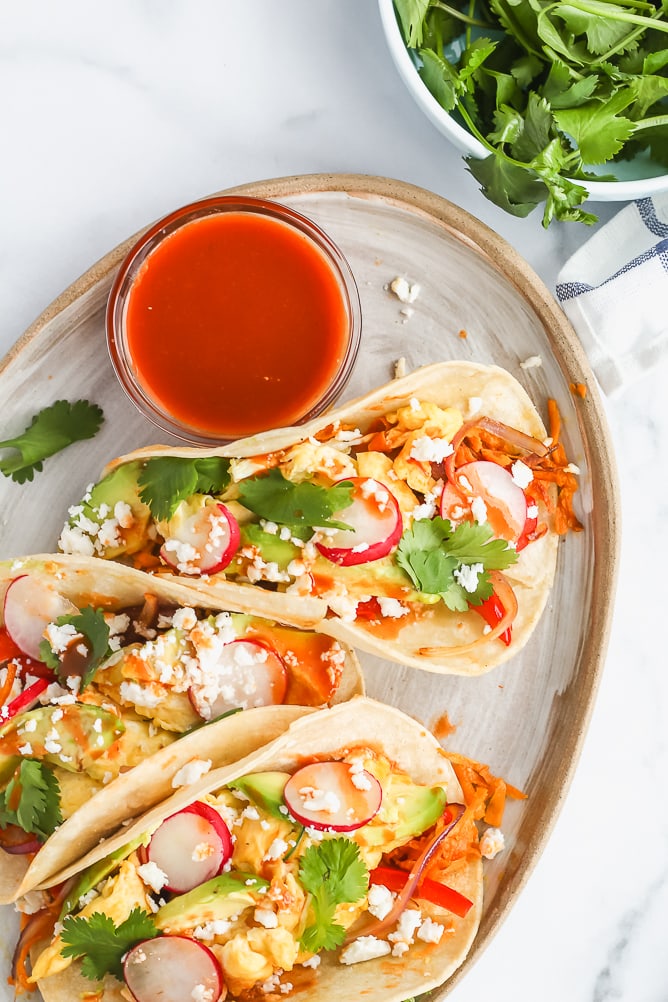
Here’s what makes a delicious easy breakfast taco

Tortillas: The base of the perfect breakfast taco, warm them in a frying pan at medium heat and then wrap in a kitchen towel to keep warm while you make the taco filling.

Sweet Potato: Shred the sweet potato on cheese grater and sauté in a bit of olive oil until they get a bit crisp. Literally leave them in the pan in one layer until you see the edges start to brown, then stir them a bit until cooked to your liking.

Peppers & Onions: A quick sauté of peppers and onions for a dose of vegetables.

Eggs: Our main filling for these breakfast tacos. I like to cook the eggs on low for a delicious scrambled egg.


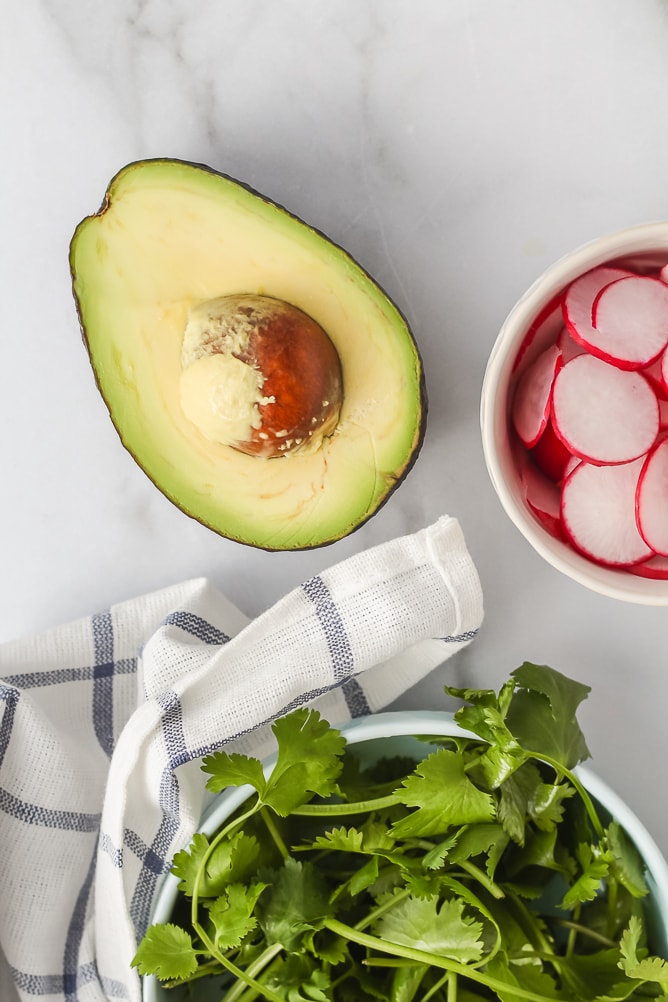
Radishes: So perfect for a bit of crunch!

Cilantro: If you’re ‘team cilantro’ then be sure to add it!

Cheese: Feta is my choice as the salt from it is perfect with these tacos but cheddar is also great.

Hot sauce: Drizzle the tacos with hot sauce for a finishing touch; I honestly wouldn’t have tacos without it.

And of course, mix and match the ingredients you have in your fridge. These breakfast tacos can be as easy as just eggs, salsa and cheese! This recipe uses just one pan for everything too.

Easy Breakfast Tacos

Easy Breakfast Tacos

Course: Breakfast, brunch
Cuisine: American
Keyword: breakfast tacos
Prep Time: 15 minutes
Cook Time: 15 minutes
Total Time: 30 minutes
Servings: 4 tacos

These easy breakfast tacos are super-satisfying and packed with delicious ingredients! A perfect recipe to use leftover veggies, pairing them with eggs for a delicious breakfast, brunch or dinner.

Print

Ingredients

  • 4 corn or flour tortillas
  • 4 large eggs, scrambled
  • 1 cup shredded sweet potato or regular potato
  • 1/2 cup thinly sliced red onion
  • 1/2 cup thinly sliced red pepper
  • 3 tbsp extra virgin olive oil (divided)
  • 1/4 cup shredded cheese
  • salt & pepper
  • suggested garnishes: sliced radishes, chopped cilantro, hot sauce, salsa, avocado, guacamole, diced tomato or cherry tomatoes, sour cream, sliced cabbage, kale or other greens for garnish
  • hot sauce

Instructions

  1. In a frying pan on medium heat, warm the tortillas, flipping to warm each side 2-3 minutes. Then wrap in a kitchen towel to keep warm.

  2. To the same frying pan add 1 tbsp olive oil and spread out shredded sweet potato. Let cook until it starts to brown around the edges, add a pinch of salt and pepper, stir and then cook a bit more until your desired doneness. Remove from pan and set aside.

  3. To the same pan, add another 1 tbsp olive oil and pepper and onions. Sauté for about 5-8 minutes until softened. Remove from pan and set aside.

  4. Lastly, whisk eggs in a bowl and then add 1 tbsp olive oil to the pan along with eggs. Cook, stirring until eggs are scrambled to your desired consistency.

  5. Assemble your tacos by spooning sweet potatoes onto each tortilla. Then layer cooked pepper and onions, scrambled eggs and topping with your garnishes of choice. Enjoy warm.

Recipe Notes

  • Make this recipe for more people: This recipe is easily doubled! Double the recipe so that everyone can have two tacos or to serve more people.
  • Need substitutions?
    • Need crunch? Use cabbage or other greens instead of radishes
    • Add more potato if you don't have peppers and/or onions
  • Leftover tacos will keep fairly well in the refrigerator for up to 2 days without garnishes; gently reheat before serving.


For a long time I forgot about how GOOD these breakfast tacos can be! They’re seriously so easy to mix and match your favourite ingredients and toppings. You could easily stretch this recipe to 6 tacos by adding beans. OR, make these full breakfast plates with a side of bacon and/or potatoes!

Other delicious breakfast taco variations

  • Bacon, monterey jack cheese and eggs
  • All veggie: pack with veggies and your favourite cheese
  • Use leftover taco meat and add eggs, cheese and salsa


Make these your own! That is what I love about this recipe; you can make them any way you desire.

Looking for other delicious taco recipes?! Try my Easy Cauliflower Tacos!

Until the next cooking adventure,
Jess

Print Friendly, PDF & Email

Filed Under: Breakfast, Brunch, Recipe Tagged With: breakfast, breakfast for dinner, breakfast tacos, budget friendly, east breakfast tacos, easy breakfast, tacos

Previous Post: « One Bowl Oatmeal Chocolate Chip Cookies
Next Post: How to Celebrate Mother’s Day at Home »

Reader Interactions

Comments

  1. Terri

    April 27, 2020 at 7:21 am

    I wish my Mom made us breakfast tacos- lucky you! I got cream of wheat, sadly. BUT I will definitely be giving my kids a different breakfast experience with these – thanks for the idea!

    Reply
    • Jess

      May 2, 2020 at 2:48 pm

      I love that you’re going to make these for your kids! It’s a fun breakfast to get the kids involved; I hope you all enjoy them!

      Reply
  2. Kelly Neil

    April 27, 2020 at 5:56 am

    Oh my goodness breakfast TACOS!! I love tacos and never think to have them for breakfast. These look amazing and I can’t wait to try them!

    Reply
    • Jess

      May 2, 2020 at 2:48 pm

      Yayyyy thanks Kelly! It’s a nice way to shake-up breakfast using what ingredients you have on hand!

      Reply
  3. Colleen

    April 25, 2020 at 3:12 pm

    Yum! We LOVE breakfast tacos, and I really love your addition of crispy sweet potatoes, which I will definitely be trying! Thanks for sharing!

    Reply
    • Jess

      May 2, 2020 at 2:49 pm

      I love that you LOVE breakfast tacos too! The crispy sweet potato is definitely a fun ingredient to try; I hope you enjoy it!

      Reply
  4. Vanessa

    April 22, 2020 at 11:18 pm

    Your photos are stunning – I just want to reach right in and grab a taco. Since that isn’t possible, this is going on the meal plan. Can’t wait to dig in!

    Reply
    • Jess

      May 2, 2020 at 2:52 pm

      Thank you for the photo love Vanessa! I hope they’re an easy meal for your meal plan & that you enjoy the recipe, I’d love to know how it goes!

      Reply
  5. Kristen

    April 22, 2020 at 9:46 am

    Loving these easy breakfast tacos. These days I feel like a short order cook, with 3 meals a day and 1000 snacks, it’s great to have something tasty and impressive that I can quickly and easily throw together. Thanks for sharing.

    Reply
    • Jess

      May 2, 2020 at 2:51 pm

      SO many meals at home right!? I hope these make breakfast (or heck lunch or dinner) an easy meal for your family, enjoy!

      Reply
  6. Yvonne Langen

    April 22, 2020 at 8:57 am

    I would never have dreamt of including shredded sweet potato in my breakfast tacos but it adds so much complexity and makes these breakfast tacos all the more filling. A perfect way to start the weekend!

    Reply
    • Jess

      May 2, 2020 at 2:50 pm

      Yassss you know it Yvonne! It’s like hash browns basically with the sweet potato and adds a nice crunch for sure.

      Reply

Leave a Reply Cancel reply

Your email address will not be published. Required fields are marked *

Recipe Rating


Primary Sidebar

About me

Welcome to Cooking in my Genes. I share my take on recipes I grew up with, foodie adventures & my kitchen creations. About me…

Claim Your Free E-Book Now!

Receive email updates and
my FREE e-cookbook with simple & seasonal recipes.

Let’s Connect

  • Bloglovin
  • Facebook
  • Instagram
  • Pinterest
  • Twitter
  • YouTube

Looking for a recipe?

Recent Posts

  • The Best Strawberry Summer Salad Recipe with Feta
  • Easy Puff Pastry Asparagus Tart with Gruyere Cheese
  • Roasted Balsamic Strawberry Appetizer with Crostini

Recent Comments

  • Jess on Easy Goat Cheese Appetizer with Fig Jam & Pecans
  • Deborah Potts Novgorodoff on Easy Goat Cheese Appetizer with Fig Jam & Pecans
  • Jess on Quick Spring Gnocchi with Asparagus

Archives

Categories

Footer

INSTA-GRATIFICATION

Dill pickle fans, this ULTIMATE DILL PICKLE DIP is Dill pickle fans, this ULTIMATE DILL PICKLE DIP is for you! 

Packed with fresh dill, dill pickles and a crunch pickle and chip topping - this is THE chip dip you need in your life 🤩

Here’s how to make is:

INGREDIENTS:
1 cup softened cream cheese
1/2 cup plain Greek yogurt (or sub sour cream)
1 1/4 tsp garlic powder
1 1/4 tsp onion powder
3/4 tsp salt
Pinch pepper or chili flakes
1/4 cup roughly chopped Dill
1/2 cup chopped Dill pickles
Garnishes: more fresh dill, chopped dill pickles and crushed Plain Ruffles Chips
Plain Ruffles Chips or other plain chip, cracker or veggies for serving!

1. Mix together softened cream cheese, Greek yogurt, garlic powder, onion powder, salt and pepper. Then stir in fresh dill and chopped dill pickles. 
2. Put the dip in a low or regular bowl, top with more fresh dill, chopped dill pickles and a handful of crushed plain Ruffles chips. 
3.  Serve with plain Ruffles chips, another plain chip or crackers or even with veggies!
•
•
•
#dillpickledip #dillpickles #chipsanddip #cookinginmygenes #easyappetizers #appetizerrecipe #appetizerideas #entertainingathome #recipereels #highproteinsnack #diprecipe
This is the BEST STRAWBERRY CHOPPED SUMMER SALAD y This is the BEST STRAWBERRY CHOPPED SUMMER SALAD you’re going to make! It’s bright, fresh and packed with flavourful ingredients like:

*strawberries
*iceberg lettuce
*avocado
*toasted almonds
*basil
*feta cheese
*fennel

It’s the perfect accompaniment to any summer meal OR top it with your fav protein to make it a full dinner. 

Recipe is on the blog, linked in my bio above!

https://www.cookinginmygenes.com/best-strawberry-summer-salad/
•
•
•
 #summersalad #eattherainbow #simplerecipes #easydinner #quicklunch #15minutemeals #saladinspo #cookinginmygenes #strawberries
Save this ONE POT LEMON GARLIC PASTA for a quick a Save this ONE POT LEMON GARLIC PASTA for a quick and easy dinner! Packed with punchy lemon and garlic flavours, this recipe comes together so simply. PLUS you can add your favourite protein to top it if you’d like.

Here’s the recipe friends!

INGREDIENTS:
3 tbsp butter or olive oil
4 cloves garlic, minced or pressed
1 tsp salt
1/4 tsp pepper
1/4 tsp dried oregano
pinch chili flakes
400-450g dried pasta noodles (rigatoni, mezzi rigatoni, penne or ziti)
zest of one lemon
4 1/2 cups vegetable broth
2 tbsp lemon juice
1 cup shredded parmesan cheese
1 tbsp butter
Garnish: shredded parmesan cheese, more lemon zest and fresh basil 

INSTRUCTIONS:
1. Heat butter or olive oil over medium heat. Once warmed, add garlic and cook for 3-4 minutes.
2. Next add salt, pepper, oregano and chili flakes (if using). 
3. Then, stir in pasta and add vegetable broth. Bring to a simmer over medium-high heat and once simmering, turn to medium-low to keep at a simmer. Cook 12-14 minutes, keeping the lid most of the way on the pot. Stir once and a while to make sure the noodles aren’t sticking to the bottom of the pot. 
4. Once noodles are cooked, there should be just a bit of liquid left, covering the bottom of the pot. If you find the noodles need a bit more time, add 1/2 cup more broth at a time and cook a bit longer until done. Stir in lemon juice, parmesan cheese and 1 tbsp butter until fully combined and you have a smooth sauce.
5. Top with shredded parmesan cheese, more lemon zest and fresh basil and enjoy!
•
•
•
#onepotpasta #onepotmeal #cookinginmygenes #quickdinner #recipevideos #easydinnerideas #dinnerrecipes #pastarecipe #vegetarianrecipes
Look no further than this CUCUMBER MINT SANGRIA to Look no further than this CUCUMBER MINT SANGRIA to cheers with on the long weekend!

This recipe along with 5 others is in my FREE PICNIC COOKBOOK that you can download by clicking the link in my bio above. 

Happy weekend friends!

https://www.cookinginmygenes.com/free-picnic-cookbook/
•
•
•
#cocktailsathome #winecocktails #yycfoodblogger#summerdrinks #bhgholiday #cheerstotheweekend #thatfridayfeeling #cookinginmygenes #lightandbright #foodphotographyandstyling #sangria #picnicfood
Sharing my BALSAMIC ROASTED STRAWBERRY DIP as the Sharing my BALSAMIC ROASTED STRAWBERRY DIP as the perfect long-weekend appetizer!

You only need 5 ingredients to make this dip AND the recipe is now on the blog!

Get the link for the recipe in my bio above & enjoy friends!

https://www.cookinginmygenes.com/roasted-balsamic-strawberry-appetizer/
•
•
•
#crostini #cookinginmygenes #easyrecipes #easyappetizers #summerappetizer #strawberryrecipes #boursincheese #appetizerrecipe #entertainingathome #budgetrecipes #cheeseboard #recipereels
This SIMPLE RHUBARB CAKE is perfect for enjoying w This SIMPLE RHUBARB CAKE is perfect for enjoying with family & friends this season!

Make this cake in one bowl and add in all that beautiful rhubarb. Top with brown sugar and cinnamon, bake and enjoy 😍

Recipe is on the blog friends, linked in bio above!

https://www.cookinginmygenes.com/rhubarb-cake/
•
•
•
#rhubarb #rhubarbseason #rhubarbcake #easybaking #cakerecipe #cookinginmygenes #thebakefeed #imsomartha #entertainingathome #inseasonnow #bakingreels
Sharing my favourite cake recipe on Mother’s Day Sharing my favourite cake recipe on Mother’s Day, my Mom’s APPLE CINNAMON CAKE WITH CREAM CHEESE ICING. 

I asked for this cake every year for my birthday and still love it to this day 🎂

Recipe is linked in my bio friends! 

https://www.cookinginmygenes.com/apple-cinnamon-cake-with-cream-cheese-icing/
•
•
•
#birthdaycakeideas #cookinginmygenes  #mothersdaycake #applecake #creamcheesefrosting #thebakefeed #feedfeedbaking #nostalgicrecipes
You need these TWO-BITE PUFF PASTRY CINNAMON ROLLS You need these TWO-BITE PUFF PASTRY CINNAMON ROLLS in your life!

They’re incredibly easy to make for dessert and perfect to add to any brunch get-together too. Here’s how to make them:

Makes 8 mini cinnamon rolls

INGREDIENTS:
1x sheet defrosted frozen puff pastry 
3 tbsp melted butter
1/3 cup packed brown sugar
1 1/2 tsp cinnamon
Egg wash (1 egg with 1 tbsp water)

Icing:
2/3 cup icing sugar
1 tbsp melted butter
1/2 tsp vanilla extract
1 - 1 1/2 milk
pinch salt

INSTRUCTIONS:
1. Pre-heat the oven to 400F and line a baking sheet with puff pastry. 
2. On a piece of parchment paper, roll out the defrosted puff pastry sheet into about 8x12 inch rectangle.
3. Brush the rolled out puff pastry with melted butter.
4. Mix together the brown sugar and cinnamon until combined. Then, sprinkle over the entire puff pastry, using hands or back of spoon to press it gently into the dough. 
5. Start from the long edge side and tightly / gently roll up into a log, trying to tuck in any filling that’s spilling out as you go. Use any leftover melted butter to press and seal the seam so the log doesn’t fall apart.
6. Cut into 1 1/2 inch slices using a serrated knife. Place spiral-side up on the parchment lined baking sheet and brush with egg wash if using.
7. Bake 22-27 minutes until puffy, golden brown and bubbling.
8. Allow to cool for a few minutes on the baking sheet and then move to a baking rack or plate.
9. Make the icing by mixing together the icing sugar, melted butter, 1 tbsp milk, vanilla extract and pinch of salt. If you’d like a bit looser icing, add another 1/2 tbsp milk.
10. Drizzle the icing over the cinnamon rolls and enjoy! Store in an airtight container at room temp for up to 2 days.
•
•
•
#puffpastry #puffpastryrecipes #cookinginmygenes #yycfoodblogger #minidesserts #brunchrecipes #minicinnamonrolls #cinnamonbuns #recipereels #easybaking #entertainingathome
Follow on Instagram

Copyright © 2023 · CookinginmyGenes.com